Slate Your Shot Like A Pro
- jorge
- Nov 27, 2021
- 2 min read
Updated: Jan 20, 2022
Slates are part of the work submission process in VFX. In fact, every production has a unique and very specific specification of how shot information should be shown.
Dealing with large quantities of shots from different vendors can make it difficult to give notes and maintain communication. It is in everyone's best interest to formalize and unify the submission process.
This guide will show you how to install a custom nuke gizmo and use the slate on the work you will be submitting in class.
Download jr_slate.gznc (**This gizmo was created using Nuke Non Commercial**) .
Copy the gizmo to your home directory .nuke folder. For additional info click here.
On Linux or OSX
cd ~/.nuke
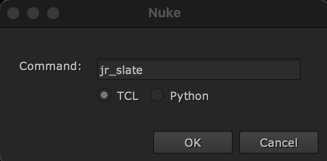
Open Nuke, hit "x" in the node editor to load a custom tcl or python script.
If you really can't figure out how to install the gizmo, then copy and paste this code in Nuke's node editor.
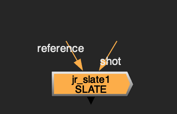
Connect your plate to shot. Connect your reference to reference. The slate node will auto resize your footage to 1920x1080. It is best to use shots that are 16:9 aspect ratio. The shot will also be letterboxed for 2.39 aspect ratio to check framing composition.
The slate parameters are pretty self explanatory. Replace all the info with relevant info for you and your shots.

jr_slate will append single frame with information from the shot and parameters. Make sure you fill in all the proper info. For your convenience, the gizmo will also automatically place the reference image for you on a selected corner.
80's BG - toggle between pixelated bg and grid
class - course code
artist name - your name
shot name - make up a name for your shot
version number - start with v001, when you get a note move up to v002. If you have multiple variations use letters, v001a, v001b, etc.
feedback for - choose what you are submitting from drop down menu.
source file - place a path for where your DCC source file can be downloaded from. For example: week01/jorge/exercise1.ma week01/jorge/flipbook/particle_sim.hip
notes - leave detailed notes on problems, progress and feedback you are looking for
Picture in Picture - PIP is used to show the reference footage you are matching to. Avoid using slow motion clips and still frames. Use the index to move the reference image to different corners. 0 will disable the PIP.
PIP Size - adjust the size of your reference clip.
Your results should look like the images below for the first frame and subsequent frames.


Append a write node to the gizmo and use apple prores codec. Yes, the files will be large but this will ensure your quicktime is readable in OSX, Linux and Windows.
The quicktime generation process was intentionally left as a manual process. Be consistent with your file naming convention and save the quicktimes in a safe folder for future reference.
The recommended file naming sequence is first_last_description_version.mov

Remove the slate once your shot is finalized.
Change log:
jan 14 2022 - set default to non ACES color spaces, added checkbox to enable ACES


Comments